Ever get frustrated because your bottles of glue clog up! Watch the following YouTube video from Jennifer McGuire and get some helpful hints on how to keep your bottles of glue from clogging up. Now go and burp that bottle of glue. TFL!
Thursday, March 26, 2015
More Prima Doll Coloring
I am still trying to get the hang of coloring and shading. But my biggest concern is the black ink used for stamping my images. I have tried several....Stazon and Archiever's but it still seems to bleed when coloring over it. I have even heat set my ink and left it over night. Guess I will go to the ProMarker site and see what ink they recommend. In the meantime here are some dolls that I have played with.
I also hate fussy cutting but am getting pretty good with my craft knife. I am also using my Brother Scan and Cut to cut.
Here are some finished dolls and you can see I still need lots of practice but since they are just for me they are pretty good. the bottom left hand one was my first doll every to color. I cut her dress out of some pretty paper. Her shading was way off but I like her dress so she will go somewhere in my craft room. TFL!


Wednesday, March 25, 2015
Prima Dolls and Altered Art
I was at a crop this past weekend and someone there was coloring these awesome dolls called Prima Dolls made by Julie Nutting. Aren't they the cutest thing ever! A new scrap friend had a bunch of them and she said I could borrow them and I stamped away. As soon as I pulled the stamp up from my paper I was hooked!
I also have discovered altered art and Gelli plates. OMG...a monster has been created. I had always wanted to try altered art. So I took the plunge and jumped in. All I can say is this is so much fun.

I used a giant tag for my doll that I stamped onto a dictionary page that I bought at a thrift store. I used item I had laying around my craft room to make the tag. After searching on Pinterest for Prima doll tags this is my version. I cut her dress out twice to add some dimension and I cut a heart doily out for the ruffle on her hem of her sleeves and her dress. I then used the same dictionary page to make a rolled flower and added some lace to complete the tag. TFL!
Saturday, March 21, 2015
IT'S HARD BEING GREEN- USE YOUR STASH-MARCH
Happy Belated St. Patrick's Day! This month on the Use your Stash Blog hop we are featuring the Color Green. I also have the honor of being the leader this month. We have 12 fabulous ladies participating for the month of March, Each month of the year we have a specific theme that we focus on. Our players vary each month also. This is a fun way to use your stash and think about what we have just laying around waiting to be used. As a paper hoarder these bloghops have really helped me to focus and bring out the oldies but goodies. I love seeing what everyone comes up with each month on the Use your stash Bloghops.
Now remember the bloghop goes in a big GREEN circle so if you get lost along the way come back to my blog to see the complete list of players. And while you are visiting each blog leave a little loving at each one please.
Here is a list of all our players
This month for my hop I decided to make a spinner card for my two youngest grandsons who just celebrated matching birthdays. They were born two years apart but on the same day. The oldest is three and the youngest one turned one. I wish the stamp said "lucky me" and not "lucky you" because those two boys are so sweet and lovable. I wanted them to know that they are my pot of gold at the end of the rainbow. I would rather have these to boys in my life than a pot full of gold.
I found a tutorial on YouTube under spinner cards. I love this card and I thought the boys would enjoy watching it spin and spin around. They are really easy to make.
I dug in to my stash of CTMH cardstock and pulled out a sheet of Key Lime CS (1235) and made an A2 card. I cut a piece of Glitter Paper from the Green assortment (Z1847). I used stamp set Lucky You (B1300) and stamp set Seasonal Thoughts (C1222). I stamped with Black Archival Ink (44751) and Clover Meadow Ink (Z2113). I colored my Leprechaun and the pot of gold with ShinHan markers......Vivid Green (G46), Barely Beige (YR29), Pastel Green )Y49), Cerulean BlueLight (B262) and finally Peony Purple (P282) were the colors that I used. I highlighted the gold coins with aa Gold Gelly Roll pen.


This was such a fun card to make and I hope that my Grandsons enjoy their St.Patrick's day card.
Now head on over to Sheila Bennett's blog and check out how green her blog is. Thank you every one for visiting my blog. Be sure to check out all the blogs and leave some love at each one,
Happy St. Patrick's Day!
Wednesday, March 11, 2015
Pocket Letter Pals
Wow have you seen the latest craze going on on Facebook and InstaGram? It is called Pocket Letter Pals. It all started when the creator Janette Lane was trying to do Project Life on a budget. She found the baseball card inserts.. She then decided that this would be an awesome way to start saving PenPal letters for those folks that still wrote snail mail. Here is her 1st video on how this came about.
Well I watched and I immediately wanted to be part of the new craze. What an awesome idea! And you only have 9 pockets for fill up. Of course you can go as elaborate as you want or take the simple route. It is up to you to decide how you want to present your pocket letter page. You then find someone who wants to exchange with you.hence the PenPal concept. So over on Facebook people will post their pocket letter and you request to do an exchange with them. There are also little holiday swaps you can join,. You can just get a group of your friends together and draw names and exchange Pocket letters like that. Just ask what do you like...birds, cats, dogs, what are your favorite colors? Or just make a surprise page. Now remember it is all about your creativity not about well look at hers mine is so plain. It is the thought that you put into it that counts. Sometimes the simplest things are the prettiest. I am so excited and I just want to make all kinds of Pocket Letters and have them ready to mail out.
What a great way to use up scraps of pretty paper. You cut your inserts to 2 1/2 by 3 1/2 and then add quotes, flowers, brads, buttons, washi tape, tea bags, coffee, lace, ribbons, pictures from magazines, then add a little note about yourself, the things that you can put in a pocket are limitless, You don't have to go out and buy anything just look around we all have something that we can insert into to pockets. I kept opening boxes last night and saying OMG can't wait to make another page just so I can put this in there. I was amazed how much I had. Just remember the more you add the more it will cost to mail.
I used CTMH paper call Hopscotch for this pocket letter. I had some left over buttons, twine and stickers. I put a tea bag in the middle and added some bling to it. While making this I was looking at all my stash and boy was I amazed how much product I had left over. We all have that one little flower left over or that one cute saying or that one clip. Why not mail it off to a Pocket Pal? Once your page is complete just fold it into thirds and insert it into a #10 envelope. Of course if you made a really fat one you may have to put it in a padded envelope.. Don't forget the heavier and bulkier it is the more it will cost to mail. Rates for overseas usually start at $3. If you do decide to exchange with someone set a time frame so you each well know that you have certain about of days to mail out your letters. There is always that chance that someone will not mail you a Pocket Letter back. Don't get discouraged just get another Pocket Letter Pal or only exchange with those that you know for sure are going to mail one back to you. Have fun!
What do you do with your pages once you receive them? Well you can put them all together in a binder or even use some of inserts on a layout or a card. You can do this with anyone. You don't have to be a scrapper or a card maker to do this. All you need is imagination and baseball card insert pages. You can get these at $Tree or Walmart or any type of store.
I am excited to be part of this new group and I can't wait until I get my first Pocket Letter.
Thanks everyone for looking and off to make my next Pocket Letter and make a new friend.

front of my Pocket Letter

the back of my Pocket Letter

wrapped in pretty paper

Ready to mail out to my new friend.
Thursday, March 5, 2015
CTMH PAPER FOCUS BLOG HOP

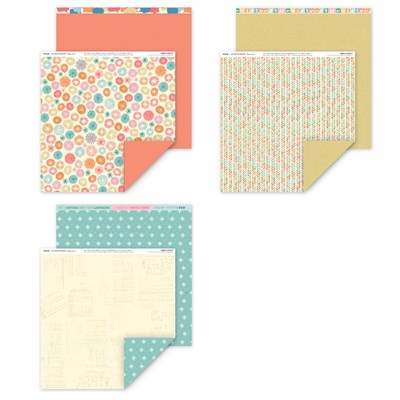
Welcome to the Heartfelt Sentiment CTMH Paper Focus Blog Hop Featuring Paper pack Hopscotch. This is such a cute paper pack. I loved working with it.
If you are not familiar with bloghops they go in a big circle. We have a team leader that has the list of everyone doing the hop so if you get lost along the way go back to Melissa's blog to see the whole list.While visiting each site leave some love to each of the talented ladies that participate each month bringing you awesome creations.
We have 8 ladies playing this month. You should be coming from Judy Faye's page. As usual she has an awesome creation.
I chose to do a layout out of the Magic Book (9040) $14.95


I changed the layout just a little bit from the book. I put horizontal photos instead of vertical and I used a 4 x 6 photo instead of a 5 x 7. I still think it came out really cute. These are photos that we took at the rehearsal dinner of my youngest son's wedding, My new daughter in law is an awesome girl and a perfect match for my son. The first photo is of me and her mom. The one's with the boy and girl are of my niece Laila and her nephew Jay. She is beautiful inside and out. It is my honor to have her as my daughter in law.
To complete my layout I used Flaxen CS (X5771) for my base pages and used assorted B&T's from the Hopscotch paper pack (X7194B). I also used Smoothie CS (X5763) and Glacier CS (X5770). I inked my edges with Dessert Sands Ink (Z2118) and inked the "SERIOUSLY" arrow with Ponderosa Pine Ink (Z2145). Complements (X7194C), Hopscotch Assortment (Z3016), Flaxen extra thick twine (Z3036) and Aqua Dots (Z1853) finish out the layout. TFL!
Now head on over to see how Marianne Hancock focused on this month's Paper Pack featuring Hopscotch. Now remember to leave some loving at each and every blog if you have a moment to spare.
Subscribe to:
Posts (Atom)